May 28, 2021 | wedding planning
Well, it’s officially wedding season, because recently I had my first on-site, live, in-person wedding since October 2019. And it was a fantastic way to get back to planning weddings.
This was a small, low-key backyard celebration at the groom’s parents’ home. The couple wanted a non-traditional and eco-friendly wedding, and that was exactly what I was able to help them have. They brought in everything they needed so guests could be outdoors and comfortable. We had tents, upscale portable restrooms, a composting service, a pizza truck, a mobile bar service–and puppies!
“Wait, did you say puppies?” Yes, puppies. The couple and their families all love dogs. Being from out of state, these two couldn’t bring their own dogs with them. But it didn’t seem right to them to get married without any dogs present. They got in touch with the local humane society, who had three beagle mix pups they could bring. It was great! The puppies got much-needed socialization time during cocktail hour, the guests (especially the kids) got to play with puppies, and the humane society got a nice donation.
As my first pandemic wedding, it was educational for me–and quite safe. It goes to show that you can follow all health department guidelines and still get married and have a good time. Here are a few photos I took.
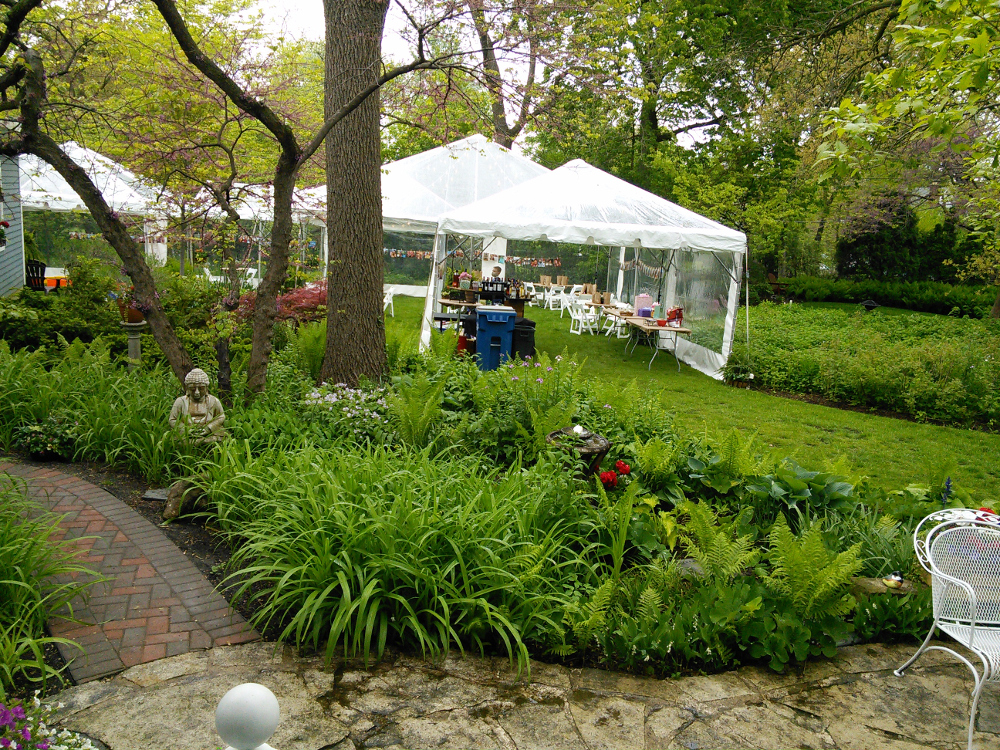
Indestructo provided their usual high-quality tents for the wedding.
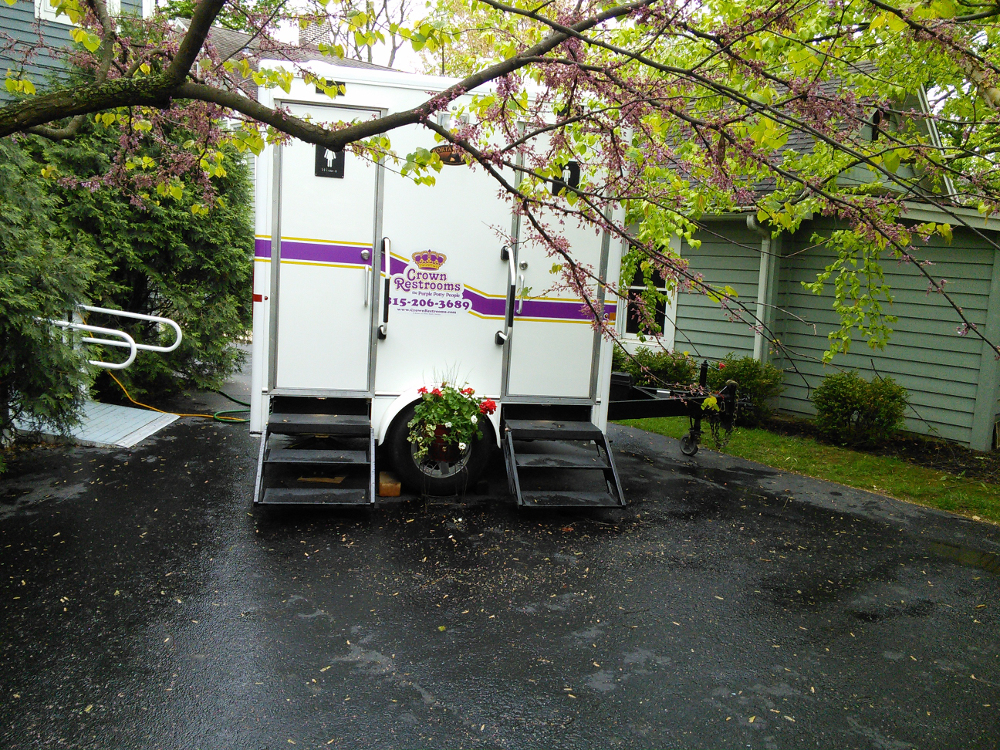
Restrooms are not glamorous, but the fancy restroom trailer from Crown Restrooms almost makes the cut!
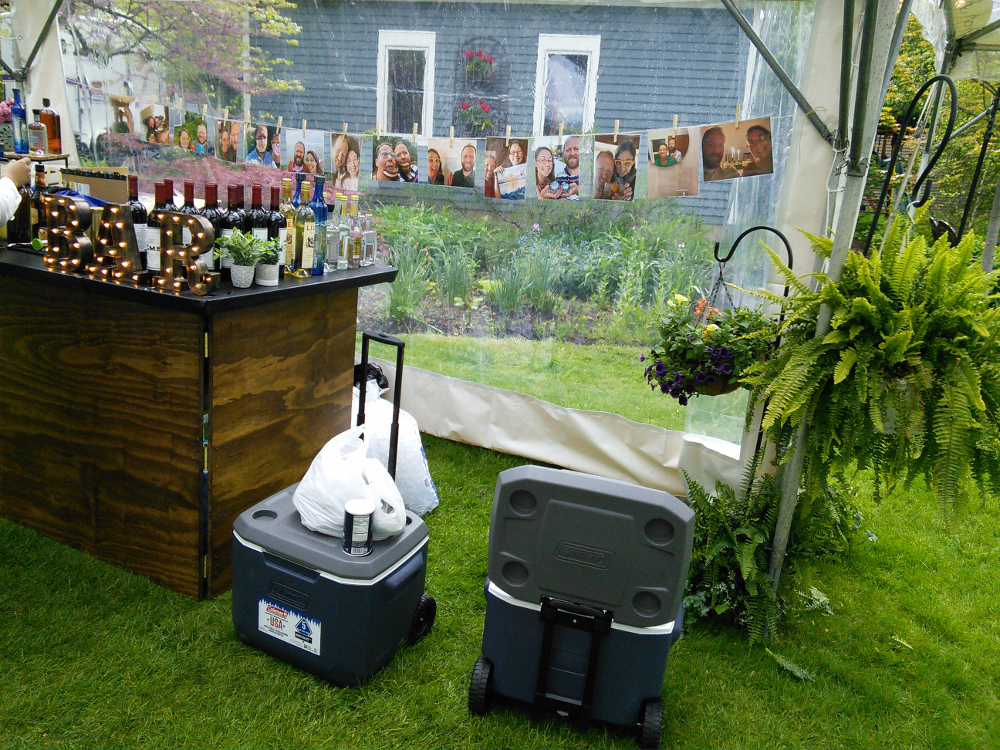
If you want glamorous, CLaS Mobile Bar definitely fits the description!
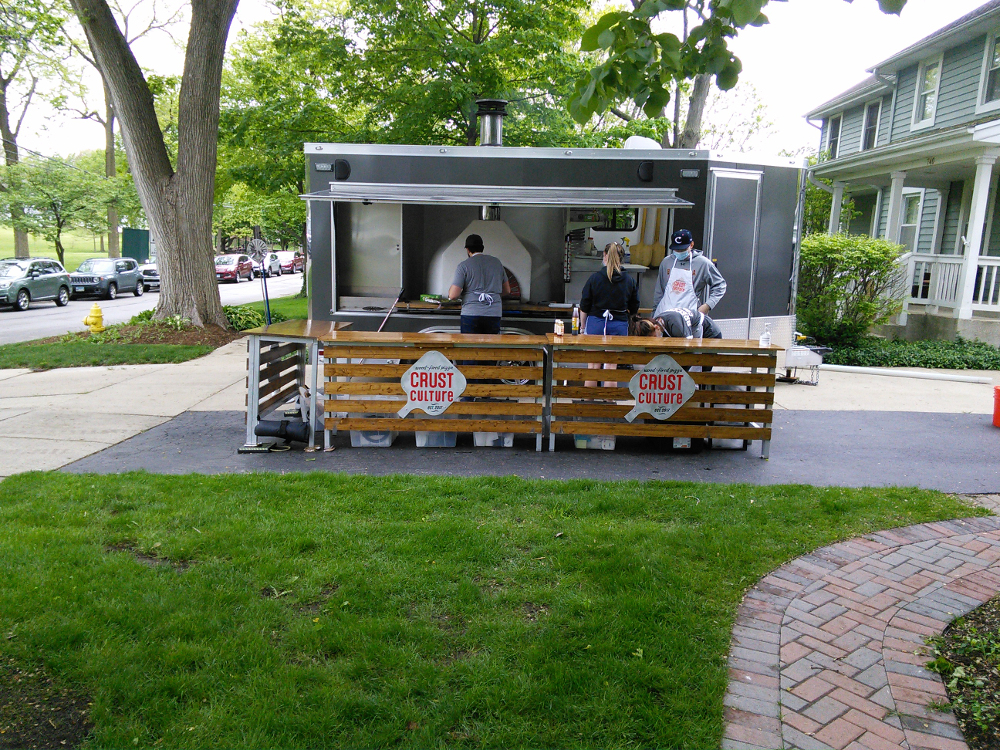
The Crust Culture pizza truck is a pretty amazing set-up.
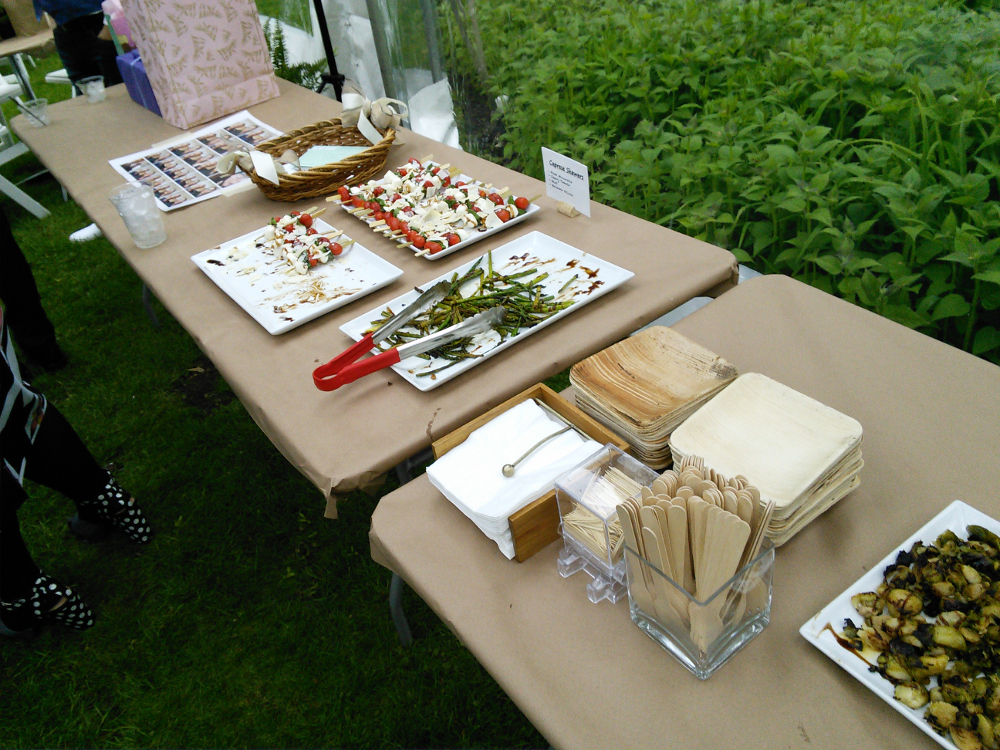
Crust Culture also did a nice appetizer buffet. Note the compostable dishes. The bar service also brought compostable cups, and so there was almost zero waste at this wedding!

And there were puppies! The couple were the first people to greet the pups as they came out from their carrier.
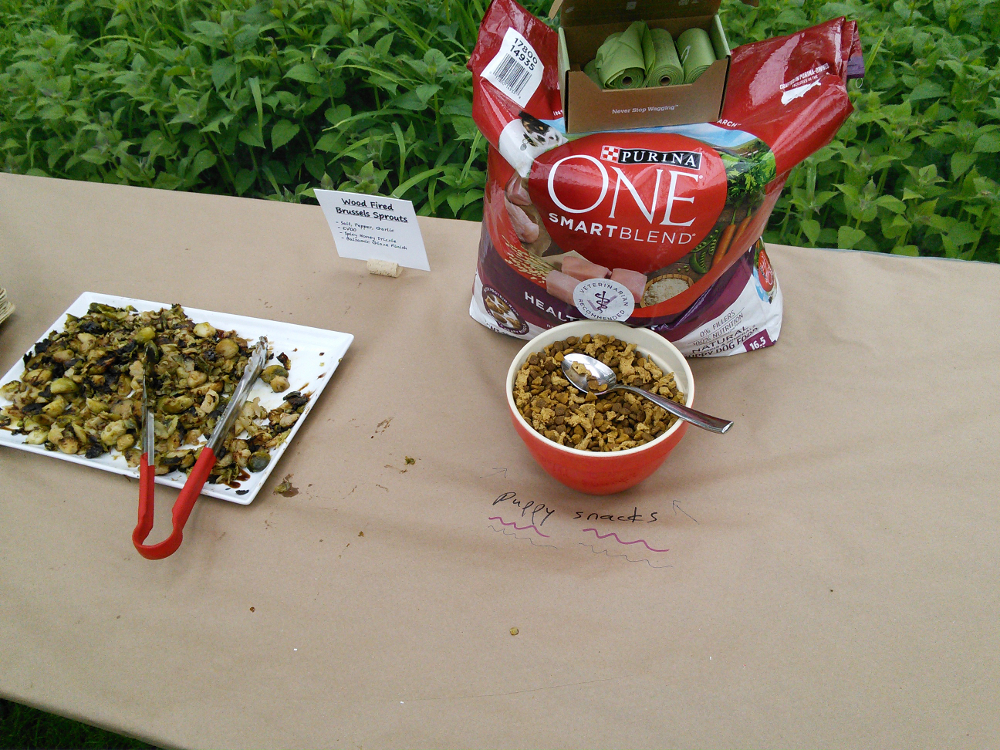
There were snacks for the puppies, too.

The groom’s mother baked this gorgeous cake for them, and decorated it with sugar photos of the couple.
I hope to be able to share the professional photographer’s images with you at some future time, because this was a really fun wedding, and I’m sure she captured it much better than I could.
May 5, 2021 | wedding planning

Do you feel like this sometimes? Photo by Paul Grigonis, pplusgphoto.com
It’s springtime in Chicago–in more ways than one. Not only is the weather warming, but we seem to be getting ready to return to some kinds of in-person life with people outside of our own households. I won’t say that we’re returning to “normal,” but perhaps it will be possible to have a social life again.
I know I’ve been getting a lot more inquiries about wedding planning lately. And I have my first in-person, COVID-safe, tiny wedding coming up in less than two weeks. That will be the first time I’ve planned and managed a wedding in over a year and a half. (Don’t worry: I haven’t forgotten how to do it!)
With the state and the City of Chicago announcing plans for dropping capacity limits by mid-summer, it feels like the end of a very long winter. Of course, I’m from Chicago, and I know that the weather is fickle, so I’m assuming that we’re still going to have one more (metaphorical) ice storm, and the re-opening plan won’t go as smoothly as currently predicted. Also, my personal prediction is that the mask mandate will likely be in place for far longer than anyone currently expects. Even so, it’s nice to contemplate a foreseeable future when we should be able to gather safely in person, celebrate, and have a good time.
Jan 13, 2021 | wedding planning

We could all use some celebration, right? Photo by Geneve Boyett Photography.
Well, it’s 2021. Not much has changed here, except for the calendar rolling over. But I’m still here and waiting for some long-expected changes so that we can go back to having social events.
Yes, I’m still in business. I’ve been hunkered down for almost a year, but I’ll be more than ready to get back to work when it is safe and legal to do so.
In the meantime, I’ve been very busily learning everything I can about how to have safe events under the current circumstances. I’ve joined the Event Safety Alliance, in order to have access to all of their terrific information. And I spend some time almost every day learning from all sources about best practices and how to implement them.
There’s still a lot of hunkering to do before we see the light at the end of the very long tunnel we’ve been in, but I hope to see people’s actual faces sometime this year. And maybe there will be a few celebrations. I know we’re all ready for some.
If you are thinking about 2021 or 2022 celebrations, feel free to get in touch with me so we can talk about your plans.
Nov 13, 2020 | Other Events
Update as of Monday, November 16: The market is definitely not going forward. First Presbyterian refused to allow permission to use their parking lot. Please share this information with your neighbors and friends. I don’t want people to show up and be disappointed because there is no market. I did everything I could to make this market happen, but without a location, there can be no market.
————————————————
Bad news for all farmers market enthusiasts today. After two weeks of repeated expressions of enthusiasm from church staff, permission has been withdrawn abruptly to hold a farmers market next Saturday at the First Presbyterian parking lot. Barring a miracle over the weekend, the market has to be cancelled.
I’d like to make clear that the City of Evanston Health Department has been very supportive all along. They are impressive, thoughtful, and helpful. If you live in Evanston, be sure to thank them for all their work. They are not responsible for the cancellation.
Farmers still need your support. Some of the farmers who were to participate in this market will still come to Evanston to sell their products on the 21st. You can get more information by contacting them directly:
If you happen to have a spare miracle in your back pocket that you don’t need, would you send it my way? No?? Me, neither. See you at the markets in the spring.
Nov 8, 2020 | Other Events
 I was talking a lot in late summer about food preservation. Now, I want to talk about where my food comes from, because there’s an upcoming farmers market you should know about.
For about two decades here in Evanston, there has been a farmers market the Saturday before Thanksgiving, organized by Chris Djuric and the Immanuel Lutheran Church. About two weeks ago, we learned that the local health department denied a permit for the event, because much of it was planned to be indoors, and even the outdoor space available is too small for a market of that size.
This was devastating news for me, personally, as I always buy about 200 pounds of root vegetables at that market and store them for the winter. But it was even worse for the farmers. At the next Saturday market, I talked to a few farmers, and there was a certain sense of desperation in their eyes and in their voices at the idea of losing a market they had been counting on.
It has been a tough year for a lot of small farmers already. Those who grow primarily for the restaurant trade lost most of their business in the early part of the summer. For others, the weather (a late freeze, flood, drought, and various other plagues) reduced their sales at various times during the year.
I talked to one turkey farmer, and they had no idea what they were going to do with no Thanksgiving market. They had been raising turkeys all summer, as usual. The birds were slaughtered and already in the freezer. If they brought them to the city early, their customers wouldn’t have room in their freezers for a purchase of that size. They needed a market before Thanksgiving so people could buy the frozen turkeys and thaw them in their refrigerators before cooking them on Thursday. If people didn’t buy their turkeys, they lost their entire investment.
Well, I heard all these stories, and I knew I had to put my professional skills at the service of my friends the farmers who keep me fed all year. I could see a way to make a market happen–but there wasn’t very much time. Fortunately, the good people of the First Presbyterian Church of Evanston saw the need as clearly as I did and offered their enormous parking lot for an outdoor market. After an avalanche of citizen support for the idea, the City of Evanston finally agreed to give us a permit.
So, mark your calendars for Saturday, November 21 and come out to support your local farmers! The market will be at the First Presbyterian Church’s parking lot at the corner of Chicago Ave. and Greenwood St. in Evanston. (The church’s address is 1427 Chicago Ave., which is the corner of Chicago and Lake. Just go south from the church to get to the parking lot.) The market starts at 8:00 a.m. sharp (no early shopping, please!) and ends at 1:00 p.m.
Farmers confirmed for this market are: Adam’s Acres, Henry’s Farm, Lake Breeze Organics, Mint Creek Farm, Organic Pastures, River Valley Ranch, and J2K Capraio (cheese). Others will be announced once details are finalized.
Pandemic precautions will, of course, be observed for this market. Face coverings will be required and social gathering strongly discouraged. Capacity limits will also be enforced, so dress warmly if the weather is as usual for the end of November, as there may be a wait to get in.
I hope to see you there for one last chance to buy local food before farmers markets shut down for the season!
Sep 25, 2020 | My interests
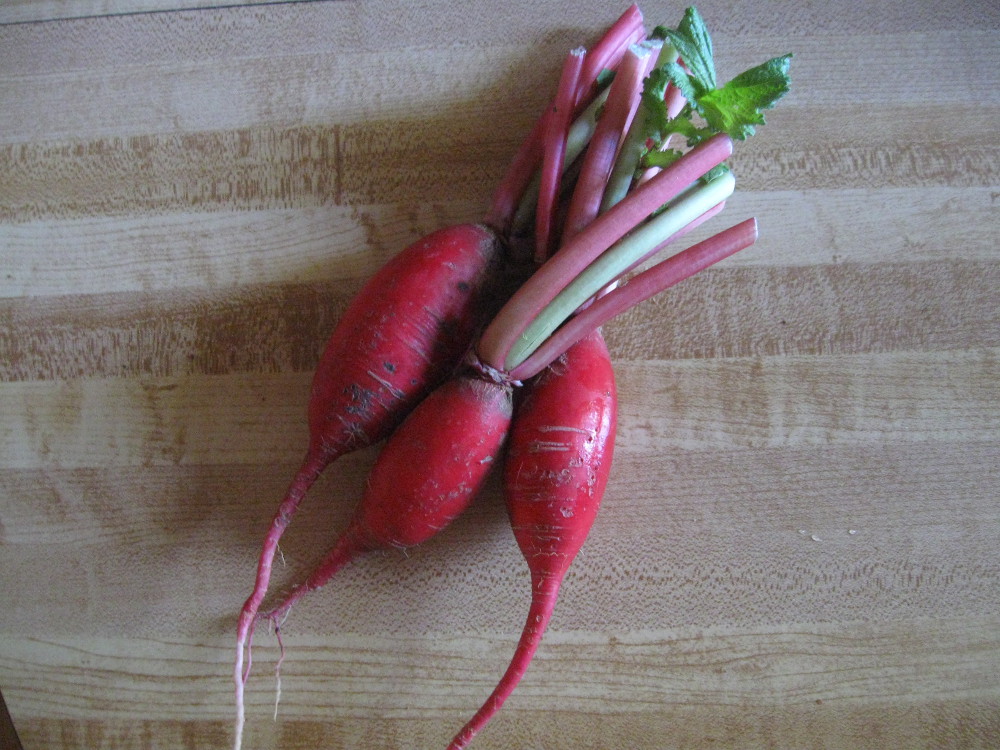
Some red winter radishes before they are trimmed for storage.
It started with the end-of-season bulk sales on root vegetables at the farmers market. There were high-quality, organic root vegetables at half the usual price. I wondered how many of them I could keep for the winter. It wasn’t just the price, either. Market vegetables taste better than store vegetables, and, facing the prospect of six months of boring vegetables, I thought I would try storing them.
While I would love to have a proper underground root cellar, city apartments and small suburban houses don’t usually come equipped with such a luxury. But that has not stopped me from storing root vegetables all winter. It takes some work to do it well, but I have always found that it is worth the effort.
I know of five different ways to store winter vegetables: in the refrigerator, in a basement space, in an unheated room, in your kitchen, and in coolers outdoors. I’ll treat each method separately. But first, there are some basics to think about.
First Things First
The first thing to know when storing root vegetables is what to store, even before where to store it. Larger vegetables store better than smaller ones, as they have a better ratio of surface area to volume. This is true across the board. Also, some vegetables—notably sweet potatoes and winter squash—should be properly cured if they are to last. Ask your farmer whether they cure their storage vegetables. If they can’t tell you, buy elsewhere.
The farmer is also a good source of information on what to buy for the long term. Near the end of the season, I find myself asking, “Does this store well?” or “Which one stores best?” Good farmers have the answers to these questions. They can make it easier to choose among types of potatoes or onions as you pick through the options.
Once you bring home your bumper crop, proper preparation makes a difference in how well the vegetables store. First, inspect what you bought. Any damaged veggies should be eaten first, as they will not keep as well. Try to store only intact vegetables.
Spend some time before you put your purchases in storage trimming root hairs and leaves. Root hairs can tend to grow mold in storage, and leaves growing from root veggies sap their nutrients and change their texture. Trimming also means you need less space for your vegetable haul. If you do as I do and buy 70 or 100 pounds of root storage crops on one day, it might take a few hours to trim them all, so plan accordingly.
Also, make sure your roots are not covered in dirt, as that also tends to promote mold growth (unless you have an actual root cellar). They don’t have to be scrubbed clean and they should be as dry as possible before storage, but they should not have a lot of visible dirt. If you want to be extremely thorough (or if you find mold growth later in the season), wash the vegetables in vinegar, then rinse and dry them before putting them in storage.
In the Refrigerator
Once you have chosen your storage crops, the easiest way to store them is in the fridge. Keep them in plastic bags that are not air-tight. A little air circulation keeps them fresher. I also discovered (the hard way) that some of the compostable plastic bags hold moisture too well. If you are using eco-plastic, put a few strategic air holes in the bag before storage.
One drawback to using the refrigerator is that if you stuff your fridge full of vegetables, you will reduce circulation, and that can lead to cold spots. I have found ice on my storage vegetables in the back of the bottom of the fridge. Once I found out where the cold spots were, I tried to keep only very hardy vegetables there. The rutabagas have never seemed to be harmed by a frost.
In the Basement
If you are fortunate enough to have an unheated basement space, you may have a good vegetables storage area. Ideal storage temperatures are between 33 and 40 degrees (F). Some vegetables, like onions and garlic, do fine in higher temperatures and low humidity. But most vegetables store best at high humidity (90-95%), so if you are running a dehumidifier, you may also be dehydrating your storage vegetables. Monitor the temperature and the humidity of whatever space you are using. Even if you can’t provide ideal conditions, you can still store vegetables, but they won’t last as long.
Last winter, I had forty pounds of onions and 50 heads of garlic stored on a shelf in the main part of the basement. It stays around 65 degrees and 40% humidity there all winter and they store fairly well.
In an Unheated Room
Friends of mine have a spare bedroom they don’t use much, so in the winter, they turn off the radiator in that room and close the door. The room stays about 50 degrees all winter, making it a handy place to store winter squashes and potatoes. If you have a room or a closet that can be cut off from heat sources, try using it for storage. It might be too warm for storing turnips, but it might work for other things. Potatoes, sweet potatoes, onions and winter squash do well at that temperature. As with every other storage method, monitoring temperature and humidity will give you the best results.
In Your Kitchen
It’s not an ideal location, but you can store some quantities of certain vegetables in your kitchen. Onions and garlic keep fairly well at room temperature, as do potatoes and sweet potatoes. All of these will tend to sprout at room temperature, but you can keep them for a few months. I have also kept squash on the dining room table all winter. The sturdier squashes (the ones with thick, inedible skins) can hold up for many months. They taste better when they are newer, but they are still edible later!
In Outdoor Coolers
My preferred method of root storage is in large coolers on the back porch. This may be the most labor-intensive method, but it has also been the most successful. Once the outdoor temperature has fallen below 50 degrees, I stack three or four large coolers near the back door and fill them with winter radishes, turnips, rutabagas, carrots, parsnips, sunchokes, and whatever else I can get at a good price at the end of the season. One large cooler will hold around 50 pounds of vegetables. I have acquired a number of the inexpensive shoulder bags that various organizations give away, the ones made of a non-woven synthetic material I put each vegetable in its own bag. Plastic grocery bags will also work, but they don’t breathe as well.
The biggest drawback to back porch root storage is cold temperatures. You don’t want to freeze your precious vegetables. If ice is forming inside the top of your cooler, it’s time to bring it in and let it warm up. We have an indoor-outdoor weather station and in the winter we put the outdoor probe into one of the coolers so we can keep an eye on the temperature from indoors. When the temperatures dip substantially below freezing at night, I bring in the coolers before bedtime and my husband puts them out first thing in the morning. When the days get really cold (below 20 degrees), I also bring them in for a few hours in the afternoon so they don’t freeze. This method probably works best for people who are home much of the day (which is a lot of us these days). If you’re gone 10 or 12 hours every day, it might not work for you.
Ongoing Maintenance
For every storage method, there is a certain amount of maintenance needed all winter long. Every two weeks or so, I check all my storage vegetables to be sure they are holding up. I refill the fridge with the smallest available roots (because the larger ones keep longer) and check over the ones that are going back in storage. If there are root hairs or leaves growing, I trim them. If there is mold, I try to remove it. I also try to give everything a good airing. You do want high humidity in your storage area, but not so high that the water condenses on your vegetables. Too much of that is a recipe for rot.
As the winter goes along, your storage chores become easier. The more vegetables you eat, the fewer need to be hauled in from the porch, checked, trimmed, and re-stored. December and January can be a certain amount of work, but after that, it is not as hard. Also, there will be some failures and you’ll find yourself putting a few things in compost. If you have a lot of rotting roots, do what you can to adjust temperature and humidity, but a few are always going to be losses.
If you can see that something won’t hold up, you can also cook it and put it in the freezer. See my earlier post on freezing produce. I’ve even stored cooked mashed potatoes when a bunch of potatoes started to go bad in the middle of the winter!
How Much to Store
I wish there were hard and fast rules about how many root vegetables to store, but it all depends on your eating habits. I kept track for a few years and discovered that if we are eating mostly storage vegetables (including what I put in the freezer), we can go through about five pounds of root vegetables in a week. Multiplying that by the number of weeks between the last farmers’ market of the season and the first market of the next season gives me a good idea of how many vegetables to buy. It took me a few years, but I’ve finally figured out what works for us. Now, for two people, I generally get about 250 pounds of vegetables by the end of November. (We eat a lot of vegetables!) If you want to buy enough to last the winter, it may take some experimentation. Fortunately, if you don’t calculate correctly, you can still buy food in the winter!
Finally
Just because you live in an apartment or townhouse doesn’t mean you can’t have winter root storage. You may not have ideal conditions, but there are plenty of options. If you’re creative, you might even come up with methods I haven’t tried.
I’ll be doing a Zoom workshop on food preservation for Wild Onion Market, my local food co-op start-up, on Tuesday, September 29 at 7:00 pm CDT. You’re invited to join in: https://us02web.zoom.us/j/89593190791.
Sep 17, 2020 | My interests
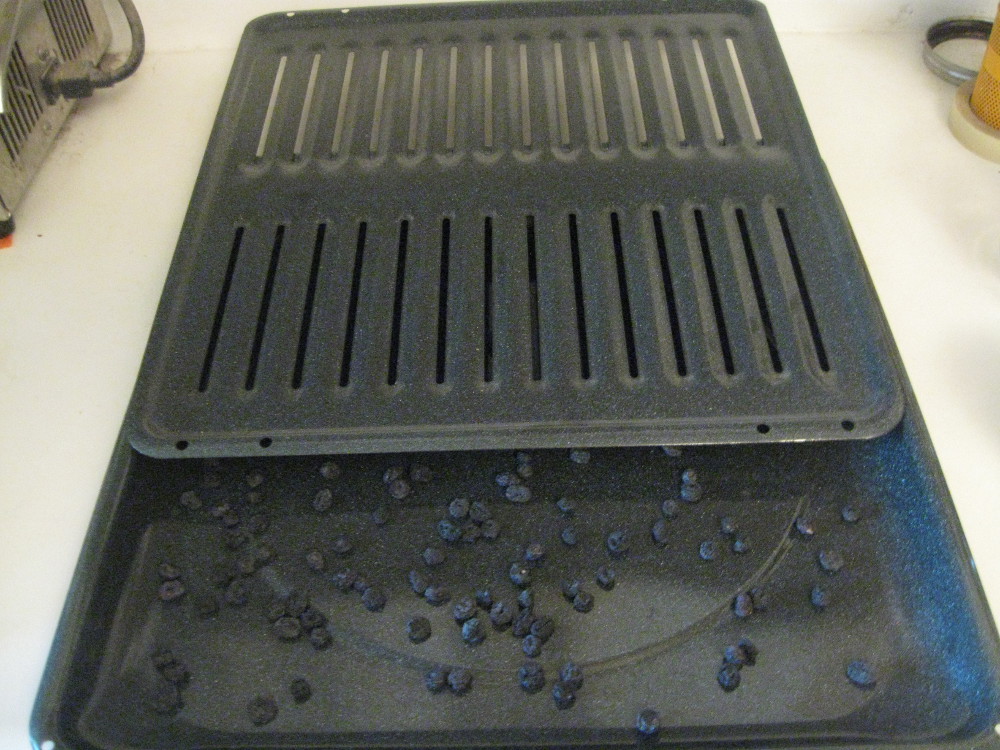
A broiling pan with dried blueberries.
Have you ever thought about drying your own fruits and vegetables but been put off by the need to acquire a dehydrator? Well, it turns out that you don’t need any fancy equipment to dry food. You probably have what you need in your kitchen already. It takes some time and attention, but the results can be quite good.
It’s a little late in the season now (in September) for sun drying things, but that is one easy way. I like to dry cherries in July, blueberries in July and August, and various other small fruits sometimes. July and August are the very best times for sun drying because the sun is at its most powerful, and there are usually a lot of hot, sunny days in Chicago. In September, there is still enough sun to dry herbs, and I like spring and fall best for that because it’s harder to burn the delicate leaves.
I’ve learned (the hard way!) that if you are drying fruit or anything that might be tasty to insects and birds outdoors, it has to be covered. Otherwise, you’re just setting out a feast for the critters. (It’s also good to cover herbs to keep them from blowing away.) I use a couple of old broiling pans–the kind that probably came with your oven–and put my berries or fruit in the bottom of the pan. The top has vents to let air in and out, and the pans are usually a dark color, which heats up the air inside it. Juicy fruits set out in the sun all day usually dry in about three days.
It’s important to bring in your dehydrating at night. Otherwise, it is likely to collect condensation, which is really counterproductive. So, at night (and on cloudy days), I bring in the pans, put them in the oven, and turn the oven light on. That heats up the oven to a nice, warm temperature. It isn’t hot enough to cook the food, but it’s just warm enough to dry it slowly.
In fact, if drying food outdoors isn’t an option for you, you can just put it in the oven (covered or on flat pans or trays) and turn the oven light on. It does take longer than sun drying, but it is about as effective. If you want a little more heat and want to spend a little money on the project, you can buy a lamp cord with a socket at the hardware store and put an incandescent bulb in it (another oven bulb, if you can’t find another kind) and put that in the oven. That will probably be too hot some of the time, so it’s important to monitor the temperature and turn off the second bulb if it gets over 140F or if it looks like the fruit is cooking. (Note: Fluorescent light bulbs and LED bulbs do not generate enough heat for this purpose. You need to use an old-fashioned incandescent, which gives off a lot of heat. These are only available now as specialty bulbs, such as oven bulbs.)
Here are a few caveats and technicalities: Ideal drying temperature for fruit is 140F. Hotter than that cooks the food, which isn’t the effect you’re after. It won’t really hurt it, but it changes the texture. A standard kitchen thermometer or oven thermometer is helpful for monitoring the temperature, but you can also just keep an eye on it to see how it is doing. If it starts looking cooked, reduce the temperature. Fruit will dry at lower temperatures, but more slowly. Below 100F it will usually mold before it dries, so aim for the higher temperatures.
It’s important to cut large, juicy fruits into smaller pieces. Pit cherries, slice strawberries, cut cherry tomatoes in half and remove the seeds. Place them juicy side up on the tray for the first day to give them the best possibility of drying.
It’s also important to have some higher heat for the first half-day to day of drying. If fruit doesn’t get a bit of a crust on it the first day, it is more apt to mold. But if the surface dries in the beginning of the process, then it will turn out edible. You can accomplish this by making sure your first day of sun drying is hot and sunny or by heating up the oven to the lowest temperature before you put the fruit in and then letting it cool to about 140F before you put your trays in the oven.
After a day or so, stir or turn whatever you are drying so that the surfaces that were touching the pan are exposed to the air. That will cause the drying to be more even. Also, the smaller pieces will dry first. You can remove them to a sealed container once they are dry.
So, how do you know when they are done? Think of the texture of a raisin. It isn’t rocky hard, but it doesn’t have much free moisture in it. It’s that indefinable, chewy in-between stage between wet and dry, sometimes called “leathery.” When your fruit reaches that consistency, it is ready to be stored. Put it in an air-tight container and store on a shelf. Dried fruits will last at least a year, sometimes longer.
Herbs are dried at lower temperatures. 80-90F is best for those. You can, of course, also hang up bunches of herbs for drying. I do find, however, that they dry more evenly when spread out on a tray. Watch them carefully to be sure they don’t burn. Then store them in an air-tight container. Herbs lose much of their savor after a year.
From some quick research, I believe it may be necessary to blanch some or all vegetables before drying them, but I haven’t really looked into it and haven’t tried any of them, myself. You might want to do some reading before going down that road.
This might be the year to try dehydrating. You can get creative and try all kinds of fruits and vegetables. I’d be curious to know what works for you. You can find more information on drying food at the National Center for Home Food Preservation.
I’ll be doing a Zoom workshop on food preservation for Wild Onion Market, my local food co-op start-up, on Tuesday, September 29 at 7:00 pm CDT. You’re invited to join in: https://us02web.zoom.us/j/89593190791.
Sep 11, 2020 | My interests

Home-made apple cider vinegar. If you look closely, you can see the mother of vinegar (so called) in the bottom.
Time for a little more about fermentation. This is something I tell people about all the time. It’s easy to make your own vinegar, and so much more interesting than buying it from a store. I am entirely indebted to Sandor Katz’ work on fermentation for this knowledge, although I have adapted it to my own uses.
Vinegar is what happens when wine is exposed to the air and goes “bad.” Or, as I prefer to look at it, wine is an unfortunate by-product on the way to excellent vinegar. But vinegar is also just the result of a sweet fruit fermentation. All you need is fruit, water, and air. I also like to add sugar sometimes.
The easiest vinegar to make is apple cider vinegar. If you can acquire apple cider that is freshly made and contains no preservatives, you can make vinegar out of it. Organic is best, as it doesn’t have any chemicals that could slow or stop the fermentation process. Put the cider in a container that has an open top, cover it to keep flies out, and leave it on your counter. It helps to stir it for a minute once a day to make sure it is evenly exposed to the air. A few weeks later, it will be vinegar. (On the way to vinegar, it will also briefly be apple jack. If you like that sort of thing, now you know.)
I find that it usually takes four to five weeks to turn into a lovely vinegar, depending on how much fruit sugar is in the original cider. The more fruit there is, the longer it takes to ferment all the sugar into alcohol, and all the alcohol into vinegar. Once it is fully fermented into vinegar, put it into a jar with a tight lid and store it in your pantry.
I haven’t tried it myself, but I also understand that any fresh fruit juice can be made into vinegar, so if you own a juicer, you might want to experiment. The only drawback of fruit juice vinegar is that it requires a lot of fruit. That’s why I make other kinds of vinegar from the fruit, itself.
Small fruits–such as blueberries, grapes, strawberries, raspberries, and so on–also make wonderful vinegar. I’ve also used peaches and pears. All you need is about 1 pint of fruit, a quart of non-chlorinated water, 1/4 cup sugar, and an open container. The fruit is actually best for vinegar if it is starting to go a little soft and over-ripe. Both fresh and frozen fruit work well for this.
Put the fruit, either whole or cut into pieces, into the container. I use a half-gallon Mason jar. Dissolve the sugar in the water and add it to the fruit. Cover the container to keep flies out. If fruit flies get in (and they do love vinegar, despite what the proverb says), they will keep the fruit from fermenting properly, so be sure to cover your vinegar securely. My method is to put a piece of cheesecloth or a tea towel over the top of the jar and secure it with a rubber band.
Once a day, check the vinegar, stir it for a minute, and re-cover it. After a week, strain out the spent fruit, mashing it to get all the juice from it. Put the vinegar back in the container and keep it covered. Stir it once a day for about another two weeks. You might want to taste it along the way to see how it is. After a total of about three weeks of fermentation, it will start to get sour. Once it tastes like vinegar, it is done, and ready to be stored in a tight container in your pantry.
When you are making vinegar, you want to expose as much of it as possible to the air. When you are storing it, you want to keep it from the air as much as possible so that it lasts longer. I like to transfer it to smaller containers as I use it up so there is less air in the jar. But most vinegars will last 6 months to a year on the shelf. If they started out with a lot of sugar, they will last almost forever. The ones with less sugar (either fruit sugar or added sugar) might lose their savor after a few months.
Ready to give it a try? It’s easy and fun, and you’ll never find anything like it in a store.
I’ll be doing a Zoom workshop on this subject for Wild Onion Market, my local food co-op start-up, on Tuesday, September 29 at 7:00 pm CDT. You’re invited to join in: https://us02web.zoom.us/j/89593190791.
Aug 27, 2020 | My interests
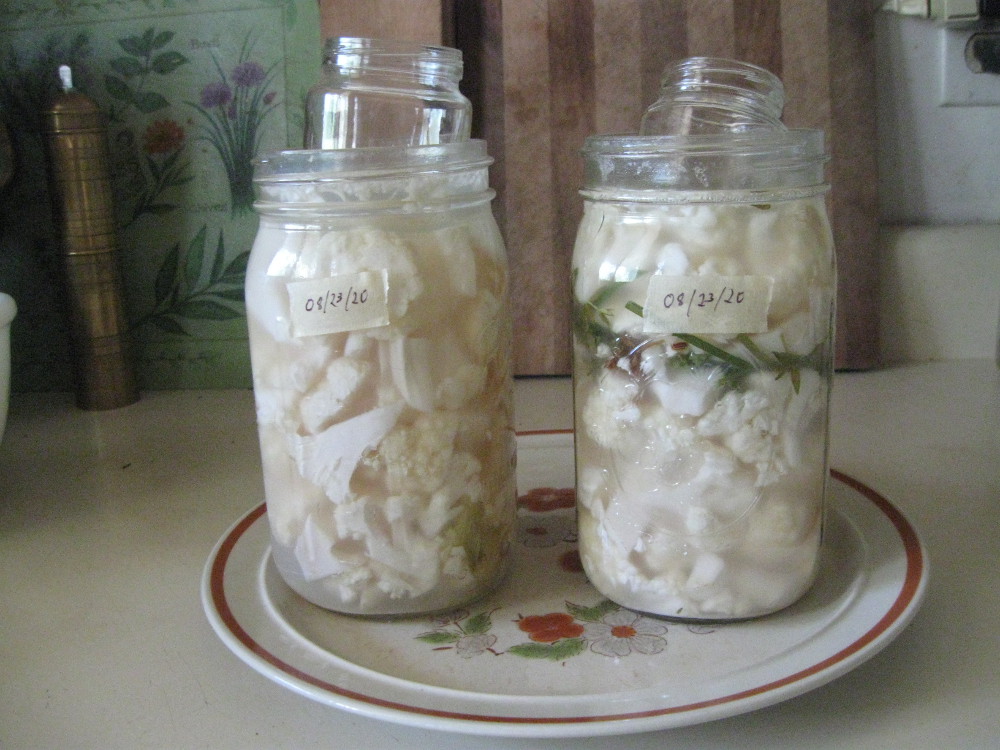
Here’s what is currently pickling on my kitchen counter: two jars of cauliflower pickles, one with herbs, the other without.
If you missed my last post, you might be wondering what on earth pickles have to do with wedding planning. The answer is, “Nothing!” But it’s all part of eco-friendly living, which is what I try to do every day. And since I’m not working on weddings this summer, I am writing about other things that interest me.
Last week, I wrote about freezing food. This week, I’d like to explore a little bit of the world of fermentation. Pickling and other forms of fermentation are a whole world unto themselves, so I can just touch on a bit of it and give you some resources for further exploration.
There are two basic kinds of pickles: quick pickles (or refrigerator pickles) and brine pickles. I don’t actually know much about quick pickles, because I prefer the slow method, but all the recipes look pretty easy. Quick pickles (vegetables in vinegar, mainly) are usually canned for better shelf life.
Brine pickling is, in essence, setting up the conditions for microorganisms to preserve your food for you. This generally involves salt. If you want to get into detail, there are lots of online resources. I am also very fond of the books of Sandor Katz, who knows a lot about the subject. Try his Wild Fermentation for an excellent introduction to the subject and lots of recipes.
The basic idea of bring pickling is to put your vegetables into a salt-water brine and let them ferment for anywhere from a week to three weeks until they are pickled. After that, you can refrigerate them or can them for further storage. (Or you can just eat them without storing them!) I don’t like to can them, as I prefer not to kill all the microorganisms.
EQUIPMENT
You don’t need a lot of special equipment for pickling. You can use what you have. If you happen to own crocks and pickling weights, that’s great. If you don’t, you can use glass jars, plastic buckets, the ceramic crock of an old crock pot, whatever you have or can find for a container, as long as it is food safe.
It’s usually necessary to put some kind of weight on your pickles to keep them under the brine. As a weight, I usually use water-filled glass jars that are smaller than the diameter of the container I’m using. If I have a large container and a small weight, I’ll put a plate under the weight to hold everything down. If you don’t have a jar that will work for a weight, you can use a plastic bag filled with water or brine (in case it leaks) or a clean rock or paperweight. Be sure to clean and boil or otherwise disinfect rocks or household objects so they don’t disrupt your pickles.
It is also not necessary to use airlocks on your pickling containers. If you have them and like to use them, that’s great. But you can make perfectly good pickles without them. The only thing is that pickles exposed to the air will grow yeast on their surface (which is why you want to weigh them down to keep them under the brine). A little yeast won’t hurt you, but if you leave the yeast for long enough, it will grow a blue-ish mold that you really don’t want to eat and that will make your pickles inedible.
So, check your pickles every day while they are fermenting and clear the yeast off, rinse your weight, and put it all back. I just use my fingers to wipe yeasty mold off the surface of the brine and off the sides of the container. A lot of it will come off on your pickling weight too, so rinse and dry the weight well before you put it back.
You also want to be sure to cover your pickles with a towel or other covering to keep flies out. Flies can ruin a batch of pickles faster than just about anything. And put the date you started the pickles on the jar or on your calendar so you know when they started–and when they might be done.
INGREDIENTS
The three ingredients you need for a successful pickle are:
- Fresh vegetables
- Salt with no iodine or other ingredients (sea salt, rock salt, kosher salt)
- Water with no chlorine
Salt is often iodized or contains anti-caking agents, which interfere with the pickling process. You want to use sea salt or other non-iodized salt with no additives. It doesn’t have to be expensive. I’ve gotten cheap bags of sea salt from a neighborhood market that work just fine.
The water you use is also important. Chlorine kills the microorganisms that create your pickle, so be sure not to use fresh tap water. You can use filtered water, or you can leave the water sitting out for a few hours until the chlorine evaporates.
The basic ratios I use for salt amounts are these: If I’m making sauerkraut or something similar that doesn’t use a brine, I use about 3 T salt to 4 or 5 pounds of cabbage or other vegetables. For brine pickles, the brine I make generally has 1/2 T to 3/4 tablespoon of salt per cup of water. If you’re using a finely ground salt, you can use an amount on the smaller side, since a tablespoon of fine salt has less air in it than a tablespoon of rock salt.
So how do you know when your pickle is done? Taste it! At first, most pickling vegetables are not sour. They may even taste funny while they are fermenting. Don’t give up on them. The peculiar flavors are part of the process of transformation. At some point (and it always seems like magic to me), the brine will turn sour and vinegar-y, and the vegetables will taste like a pickle. In hot weather, with small vegetables, it might only take a week. In cooler weather, you can count on it being three weeks or even longer.
If you use more salt, the fermentation will go slower. With less salt, it will go faster. If you put in too much salt, fermentation will stop entirely, so keep an eye on how much you are using. I once had to compost an entire batch of watermelon pickles because I used too much salt and it never pickled.
So, what can you pickle? I’m pretty sure you can pickle almost any vegetable except ripe tomatoes. (Pickled green tomatoes are, of course, a deli staple, and delicious!) Soft greens are probably not a good choice, either, unless you have a specialized recipe. Cabbage, turnips, radishes, and any other sturdy vegetable in the cabbage family are a great place to start. Cucumbers, zucchini, and peppers are also easy and fun. I’ve also tried carrots, eggplant, garlic, onions, okra, and probably a few other things that I can’t recall.
If you find that you need more information, Mr. Google is a great help. I had never pickled cauliflower before, so I searched for recipes. Turns out that there is a wide range of them available! So, take what you know, find out what you need, and don’t be intimidated by the wonderful world of pickles. Start with a small batch, if you’re not sure how it will turn out. Once you get started, you’ll find out how easy and fun it is.
I’ll be doing a Zoom workshop on this subject for Wild Onion Market, my local food co-op start-up, on Tuesday, September 29 at 7:00 pm CDT. You’re invited to join in: https://us02web.zoom.us/j/89593190791.
Aug 19, 2020 | My interests
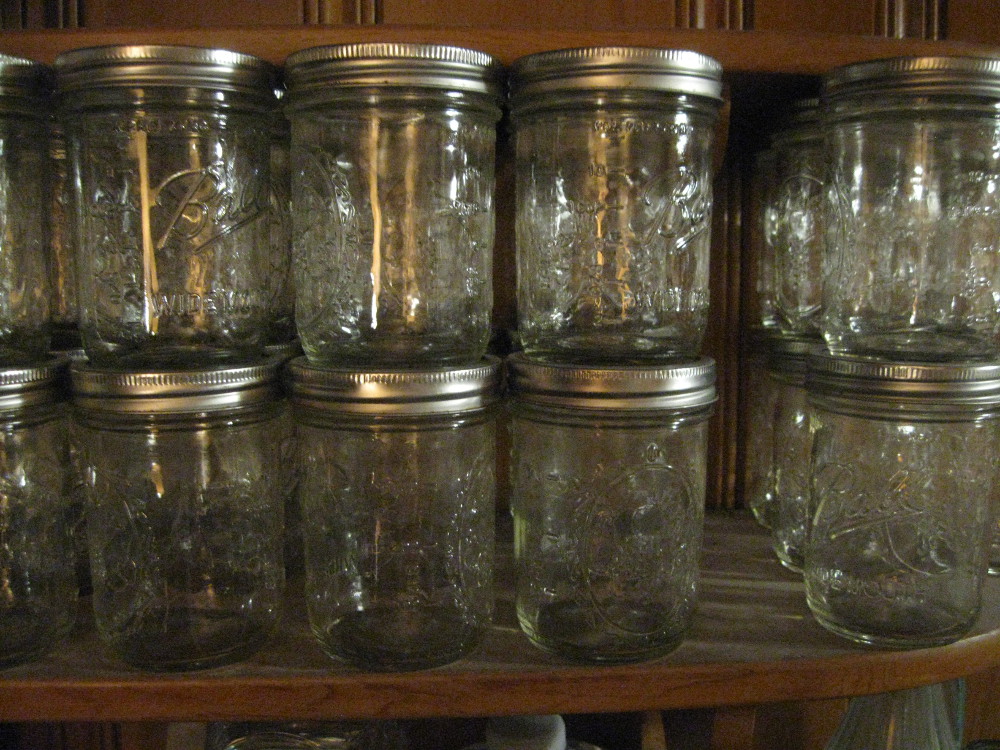
This is just a small portion of my jar collection for food storage!
Since all the weddings I was going to work on this summer have been postponed until next year, I want to share some of my other interests with you. First up, food storage! If you’re interested in eating local food (and I am), storing the summer’s abundance is one way to make sure you have the best food all winter. It also strengthens the local food system and helps reduce greenhouse gases.
It is a little-known fact that a lot of vegetable farmers grow more food than they can sell, and much of that abundance goes back into their compost piles, instead of being eaten. But we can all save a little of it for ourselves, maybe with enough to share with our neighbors.
For the last 7 or 8 years, I’ve been storing food all summer and eating it in the winter. When I started doing it, I had no idea how much work it was going to be. If you’re thinking of doing the same, I just want you to know up front that it can easily take over all of your summer weekends. I think it’s worth it!
STRATEGIES
My main strategies for storing food in the winter are freezing, pickling, root vegetable storage, canning, and a little bit of dehydrating. Because I’m not an expert on canning, I’ll share with you what I know about the other four strategies. Today, we’ll look at freezing.
The way I choose what to store is by paying close attention not only to what is in season, but to what there is an abundance of. If you see that a farmer has a sale on something, it is probably because they have a lot of it. I buy whatever is abundant and then preserve it. In the spring, it might be spinach or asparagus. Right now, it’s zucchini and tomatoes. In October, it could be turnips or rutabagas.
I also spend a lot of time talking to farmers at the market, and learning from them what they have a lot of and what they expect to have a lot of in the near future so I can plan my preserving projects.
Freezing is probably the easiest thing to start with.
What you need:
- Equipment for basic cooking
- Containers for freezing
- Freezer space
You can freeze almost anything, if you put your mind to it. Some things come out better than others, but the freezer is your friend. And the internet is also your friend. If I’m not sure how to freeze something (like, say, mashed potatoes the year I had a big batch of potatoes that didn’t survive in storage), someone has a blog post about it somewhere.
For the most part, you want to freeze only produce that has been cooked, whether lightly or thoroughly. There are exceptions, such as small berries that don’t lose much quality when they are frozen fresh. I also freeze cherry tomatoes and fresh peppers without freezing. You probably will want to cook any food you freeze fresh, as the texture does degrade.
You can make big batches of food that includes produce and freeze that, or you can freeze batches of individual kinds of produce, which is mostly what I do. I also freeze fruit sauces (apple sauce, etc.) if I don’t can them.
I like to steam vegetables in batches very lightly before I freeze them so that they come out as fresh as possible. It is necessary to cook them at least a little to prevent the cell walls of the fruit or vegetable from breaking apart when the water in them freezes. Frozen raw vegetables generally have a terrible texture. If you prefer, you can blanch vegetables (dip them briefly in boiling water) or cook them with a little water in the microwave.
Cook them (by whatever method you choose) for a minute or two until they just start to look cooked (green vegetables turn bright green), put them immediately into ice water to cool them, and drain them thoroughly. Then pack them as tightly as possible into containers (squeezing out as much air and water as possible), label them with the contents and the date, and put them in the freezer. It really is that simple.
There are some vegetables that I cook thoroughly before storing. Two of my favorites are eggplant and cauliflower. I roast them in the oven and then freeze them. Those two seem to hold up very well to that kind of treatment. Less robust vegetables seem to fare better with lighter cooking.
I also have a list posted on the outside of the fridge that tells me how much of what kinds of vegetables and fruit I have in the freezer, so I can be sure to store a nice mix of things, and so that I know how much I have. But maybe that’s just my love of spread sheets showing. If I can’t plan things, at least I can use my spread sheet skills to keep track of my fruits and vegetables!
A lot of people like to freeze food in plastic bags. I’m skeptical of plastic, though, especially at extreme temperatures, so I freeze everything in glass jars. If you are going to use glass, you can use any kind of glass jar, but don’t use anything larger than a one-pint jar. The larger jars have a tendency to crack in the freezer. (Ask me how I know!) Plastic bags do let you fit a lot more in your freezer, though, so you’ll have to do your own calculus about what works for you. Whatever you choose to do, be creative and see how much you can fit in your freezer. It really is worth the trouble.
If you start now, you can still put tomatoes, greens, broccoli, cauliflower, beans, and a whole lot of other vegetables into your freezer before the end of farmers market season. Set aside a couple of hours on the day you buy your fruit and vegetables, and get some of it in the freezer. When winter comes, you’ll feel very well prepared.
I’ll be doing a Zoom workshop on this subject for Wild Onion Market, my local food co-op start-up, on Tuesday, September 29 at 7:00 pm CDT. You’re invited to join in: https://us02web.zoom.us/j/89593190791.

Recent Comments